

Converting a Yeast Recipe to Sourdough (Without Losing Your Mind)
Mar 11 | Written By: Sabrina Huizar
There’s a special kind of betrayal that happens when you’re staring at a recipe you love like soft sandwich bread, cinnamon rolls, dinner rolls, whatever—and it calls for commercial yeast… but your sourdough starter is sitting on the counter like: hello?? I exist??
The good news: converting a yeasted recipe to sourdough is not complicated. It’s just math + patience + learning what the dough looks like when it’s happy. Once you do it a couple times, it becomes second nature. You’ll start looking at every yeasted recipe like, “Cute. I can fix you.”
Let’s do it.
What Actually Changes When You Go Sourdough
Commercial yeast is like turning on a microwave. It’s fast and predictable.
Sourdough is more like… lighting a candle, putting on music, and letting time do its thing. It’s slower, it’s moodier, and it will absolutely humble you if you try to force it.
So when you convert a recipe, you’re changing three things:
The leavening (yeast → starter)
The dough’s hydration (because starter adds flour + water)
The timeline (sourdough is slow)
That’s it. Those are the moving parts.
Step 1: Pick How Much Starter to Use
Most sourdough conversions succeed or fail right here, because people either use too little starter and wonder why it’s taking 14 hours… or use so much starter that the dough blows up too fast and turns into a sticky mess.
A really reliable baseline:
Use 20–30% of the flour weight as starter (assuming your starter is 100% hydration—equal parts flour and water by weight).
How to choose where you land:
20% starter = slower rise, milder flavor, more flexibility
30% starter = faster rise, stronger sourdough presence
Special note for enriched doughs:
If your dough includes milk, butter, eggs, sugar, honey, it will ferment more slowly (fat and sugar slow things down). For enriched doughs, you’ll usually be happier closer to 30% starter.
Step 2: Do the One Piece of Math That Matters
This is the part that makes people feel like they need a calculator and emotional support. But it’s simple.
If your starter is 100% hydration, it is:
50% flour
50% water
So when you add starter, you must subtract that flour and water from the recipe.
Example Conversion
Original yeast recipe:
500g flour
300g liquid (water or milk)
yeast
You decide to use 120g starter.
Since it’s 100% hydration:
120g starter = 60g flour + 60g water
Converted version becomes:
440g flour
240g liquid
120g starter
no commercial yeast
Same dough structure. Same hydration. Just sourdough leavening instead.
That’s the whole trick.
Step 3: Remove the Yeast
Yep. Take it out completely.
If you leave yeast in, you’re making a “hybrid” loaf (which is fine sometimes!), but it isn’t a true conversion. Yeast will dominate the rise, and you won’t actually have true sourdough.
If your goal is sourdough, commit.
Step 4: Accept That the Timeline Is Going to Change
Here’s the truth: your recipe’s timing section is about to become a suggestion, not a law.
Commercial yeast recipes often say something like:
Rise 1 hour
Shape
Rise 45 minutes
Bake
Sourdough is more like:
Bulk ferment until it looks right
Shape
Cold proof (or not)
Bake
Typical sourdough timing (room temp, average starter strength):
Bulk ferment: 3–6 hours (sometimes longer)
Proof: 2–4 hours
or overnight in the fridge
Enriched dough timing:
Bulk: 5–8 hours
Proof: 3–5 hours
or overnight in the fridge
And yes, sometimes it takes longer. Especially if:
your kitchen is cool
your starter is sleepy
your dough is heavy with butter/sugar/eggs
Step 5: Watch the Dough, Not the Clock
This is the part where you stop baking by numbers and start baking by vibe (but like… a responsible vibe).
For most sourdough doughs, you’re looking for:
During bulk fermentation:
Dough looks puffier
Surface looks smoother and slightly domed
Dough has a slight jiggle when you shake the bowl
You see bubbles along the sides
Dough rises 50–75% (not always doubled!)
A lot of people wait for “doubled,” but depending on flour type, temperature, and enrichment, that can be a trap. Especially with enriched dough, by the time it doubles, it might be overproofed.
During final proof:
Dough looks airy
Feels lighter
Poke test: gently press a floured finger into the dough
If it springs back immediately → needs more time
If it springs back slowly and leaves a slight dent → ready
If it doesn’t spring back much at all → probably overproofed (bake anyway)
Common Conversion Mistakes (So You Can Avoid the Pain)
“My dough is taking forever”
Likely causes:
Kitchen too cold
Starter not active enough
Enriched dough (milk/butter/sugar) slowing fermentation
Fix:
Warmer spot (oven light, top of fridge)
Use 30% starter next time
Make sure starter is active and mature when you mix
“It rose, but it feels dense”
Likely causes:
Underproofed (not enough time)
Starter weak
Fix:
Give it more time
Strengthen starter over a couple feeds
Don’t rush final proof
“It turned sticky and slack”
Likely causes:
Overproofed
Too warm / too long
Fix:
Shorten bulk
Chill earlier
Use 20% starter instead of 30%
Final Thoughts: Sourdough Is a Relationship
Once you convert a recipe and get it right, it’s honestly hard to go back. Sourdough gives you dough that feels alive. It has personality. It has depth. It has that soft chew and gentle flavor that makes store bread feel like packing foam.
But the tradeoff is time.
So the best mindset shift is this:
You’re not following a timer anymore. You’re learning to read dough.
And once you can read dough? You can bake anything.
From my chaotic countertops to yours…
—Sabrina
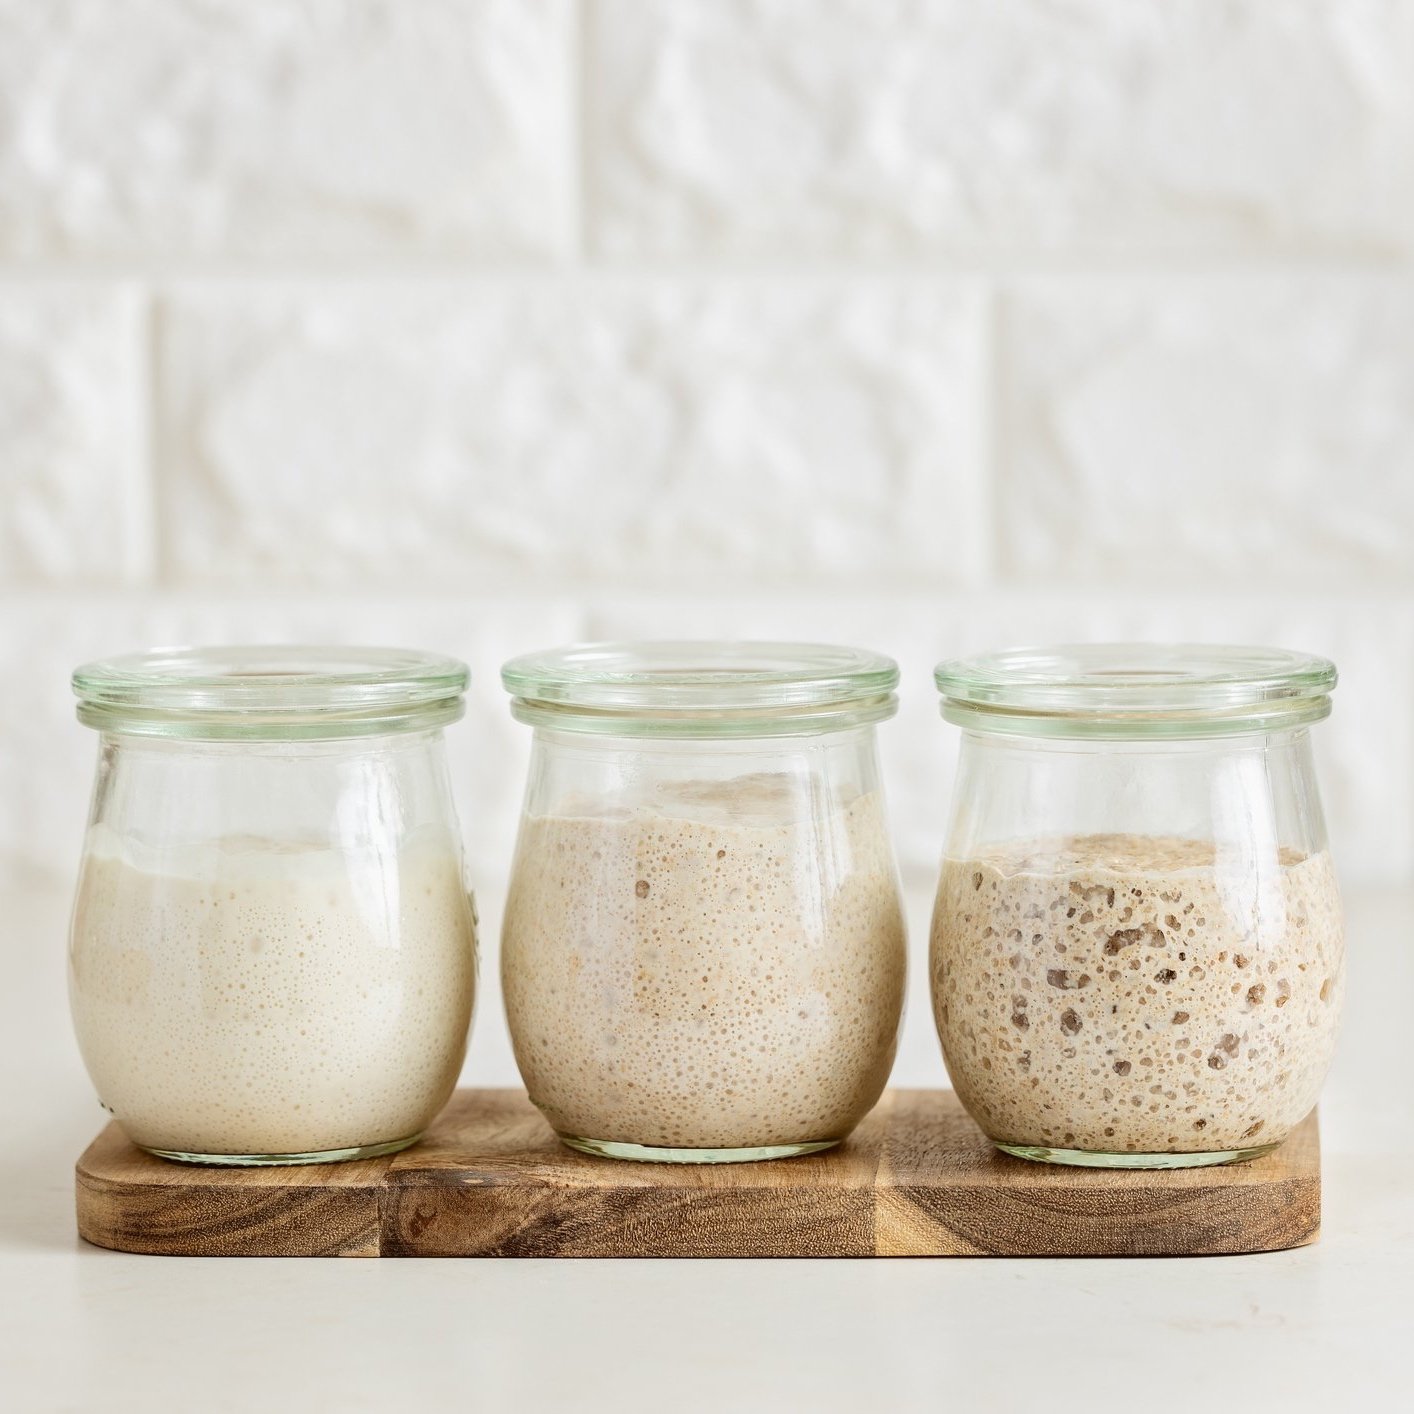
Our San Francisco “Fisherman’s Wharf” Sourdough Starter captures the unmistakable character of the famous sourdough breads that have made San Francisco baking legendary. Known for its lively fermentation and classic tangy flavor, this starter produces loaves with the signature taste many people associate with the city’s historic bakeries.
San Francisco sourdough has long been celebrated for its unique flavor profile, shaped by the coastal climate and traditional fermentation methods used by generations of bakers. This starter brings that same spirit into your kitchen, delivering the bold, aromatic character that sourdough lovers recognize immediately.
The finished breads develop a beautifully balanced tang, with a chewy yet tender crumb and a crisp crust that makes every slice memorable. The flavor is vibrant and satisfying—perfect for rustic loaves, sandwich bread, and the classic sourdough boules that feel right at home on a soup-and-salad table.
Each bake evokes the experience of strolling along Fisherman’s Wharf, where the aroma of fresh sourdough fills the air and warm loaves are enjoyed with butter, chowder, or simply on their own.
Simple, lively, and full of West Coast character, this starter makes it easy to bring the spirit of San Francisco sourdough baking into your kitchen.
Expect:
• Classic San Francisco-style sourdough tang
• Perfect for boules, sandwich loaves, and artisan breads
Bold, nostalgic, and wonderfully flavorful, this starter produces sourdough breads that capture the iconic taste of San Francisco baking.
Our Wild Dark Rye Sourdough Starter brings bold flavor and energetic fermentation to traditional rye baking. This culture is known for its lively nature, producing a vigorous starter that bakers love for its strength and character.
Rye starters are naturally aromatic and active, and this one is especially spirited. When it’s ready to be fed or used in dough, the surface will be bubbling with life and activity, so much so that it can seem like it’s ready to spill right out of the jar if ignored for too long.
As it ferments, the starter develops the rich, earthy character that dark rye is known for, creating breads with deep flavor and a pleasantly tangy aroma. Its strong fermentation power makes it excellent for producing hearty loaves with beautiful rise and structure.
The finished breads are bold and rustic with a moist crumb and the distinctive depth that dark rye flour brings. It performs beautifully in traditional rye loaves as well as rustic breads blended with wheat flour.
Simple, lively, and full of personality, this starter makes it easy to bring the bold tradition of dark rye sourdough baking into your kitchen.
Expect:
• Extremely lively and active starter
• Bold, earthy dark rye flavor
• Aromatic, complex sourdough character
• Perfect for traditional rye loaves and rustic breads
Energetic, flavorful, and wonderfully rustic, this Wild Dark Rye Starter produces hearty sourdough breads with bold character and lively fermentation.
Our French Parisian Sourdough Starter is a true gem for any baker, originating from France and rooted in the rich bread traditions of Parisian bakeries. This lively culture produces beautifully balanced loaves with a mild yet distinct tartness and a delicate sweetness that lingers pleasantly on the finish.
During fermentation, the starter develops a wonderfully aromatic character that is perfect for classic French breads. It performs especially well in baguettes, country loaves, and rustic hearth breads, helping create that signature crisp crust and tender, flavorful crumb that French breads are known for.
The flavor profile is refined and balanced, allowing the natural flavor of the grain to shine while delivering just enough tang to give the bread depth and character. The result is a sourdough that feels elegant, traditional, and incredibly satisfying.
Reliable, lively, and full of heritage, this starter brings authentic French sourdough baking straight into your kitchen.
Expect:
• Mild yet distinct sourdough tang
• Delicate sweet finish
• Balanced flavor without harsh acidity
• Lively fermentation and dependable rise
• Excellent for baguettes and classic French breads
• Crisp crust with a tender, flavorful crumb
Elegant, aromatic, and beautifully balanced, this Parisian starter helps create sourdough breads worthy of a traditional French bakery.